Showing posts with label Dessert. Show all posts

Tuesday, February 21, 2012

Tuesdays With Dorie : Chocolate Truffle Tartlets

Here comes the second recipe I baked for Tuesdays with Dorie (TWD) : Chocolate Truffle Tartlets from Baking With Julia..


I baked these tartlets for the Valentine's Day dinner that I prepared for my husband.. And it was a big success within our small (2 people) family.. I don't know what we were expecting but we could not stop raving about how good it tastes after every bite.. As soon as we finished eating, I even called my friend who is also baking with TWD at the blog myyellowcookbook to tell her that this recipe is amazing.. It is very rich in chocolate (as one may guess - 4 different type of chocolate goes in it from cacao powder to white chocolate) but not too sweet with a very melting in your mouth texture but also has crunchy bits inside from biscotti and also a cookie like crust.. Well, best of everything :)

Instagram by Ferda: Preparing the crust 
From the start I was a bit intimidated by the recipe, mainly because I had not made pie crust before and this calls for 6 small ones.. I started the recipe with preparing the crust.. Making it in the food processor seemed much easier so I opted for that.. Mixing the ingredients was very easy with the food processor, but unfortunately my crust stayed very crumbly even after chilling it in the fridge for half an hour.. I guess I should have included couple more teaspoons of iced water as mentioned by some of the bakers in TWD blog.. Learning number 1 for the next time : May need to include a bit more iced water if the crust is too crumbly.. Because it was impossible to roll my very crumbly crust, I pressed it down my tartlet pans as you would do with graham cracker crust.. It turned out fine, crust was more cookie like than tender because of this change..

Instagram by Ferda: Fresh out of the oven
The filling is a very decadent combination of 70% chocolate, butter, a lot of (8 to be exact) egg yolks, a bit sugar and vanilla extract.. Then as if this was not enough, white chocolate, milk chocolate and biscotti pieces were folded into the batter.. The amount of my filling was more than sufficient to fill six 4 inch tartlet pans, and I overfilled the tartlets as I hate throwing away food.. The result was mushroom like tops for the tartlets.. Learning number 2 : Do not fill the tartlets over the crust level..

Although it was not easy to wait, I did not taste my tartlets until the end of our dinner.. Conclusion: these chocolate truffle tartlets are heavenly.. Not too sweet, but rich, smooth and crunchy, with white chocolate and milk chocolate explosions in your mouth (mine were still a bit melted inside), and almond flavor coming thru with the biscotti pieces in it.. It satisfied every expectation that we had from the dessert course, and one was enough for both of us.. And also it went perfectly with the last sips of Australian Shiraz that we were having for dinner..


I saved one tartlet in the fridge for the next day and froze the rest.. My observation is that even though they still taste rich and delicious after refrigerating and freezing, they lose their melting in your mouth texture..

I will definately bake this recipe again when I have some guests over.. For now I am using the stock in my freezer when needed/craved :)

For the recipe, please visit the blogs of this week's hosts: A Whisk and A Spoon, spike.does.stuff, Good Eats 'n Sweet Treats and cookbookhabit. Or Page 382 of the 'Baking With Julia'.

Looking forward to posting the next recipe in two weeks..

Monday, February 14, 2011

Korova Cookies...


Here is another recipe that I tried last weekend... The original recipe is from Dorie Greenspan like the French Apple Cake recipe I posted today... I found this one at Cafe Fernando, and had my eyes on it for a while now...

These cookies are sent from heaven for those who love chocolate and especially bitter chocolate... I personally am not a big fan of chocolate desserts or bitter chocolate, but still liked a lot the cruncy texture of these cookies and also the salt after taste due to some sea salt in the recipe (The recipe recommends fleur de sel, but tells that can be substituted for sea salt)... I guess I should buy one of Dorie Greenspan's books - if all of her recipes are this straight forward and end results are this good it will worth the purchase...

Below is the original recipe from
Cafe Fernando, with my comments in parentheses and italic... Another good thing about the recipe is that you can freeze half of the dough and use later... It can be kept frozen for a month...


---------------------------------------------------------------------
KOROVA COOKIES RECIPE
recipe from “Paris Sweets: Great Desserts from the City’s Best Pastry Shops” by Dorie Greenspan
Ingredients
Yields 28 cookies
(half of my dough made 11 cookies, a bit less than what Cafe Fernando says, I might have cut my cookies bigger than his)

1+1/4 cups (175 grams) all-purpose flour
1/3 cup (30 grams) Dutch-processed cocoa powder
(I used ordinary cocoa powder)
1/2 teaspoon baking soda
1 stick plus 3 tablespoons (150 grams) unsalted butter, at room temperature
2/3 cup (120 grams) packed light brown sugar
1/4 cup (50 grams) granulated sugar
1/2 teaspoon fleur de sel or 1/4 teaspoon fine sea salt
(I used sea salt)
1 teaspoon pure vanilla extract
5 ounces (150 grams) bittersweet chocolate, chopped into small bits
(I used 70% chocolate)
Method

1- Sift the flour, cocoa, and baking soda together and keep close at hand.
2- Put the butter in the bowl of a mixer fitted with the paddle attachment and beat on medium speed until the butter is soft and creamy.
(I don't have a KitchenAid stand mixer, so I used the dough hook of the hand mixer for the stages 2,3 and 4)
3- Add both sugars, the salt, and vanilla extract and beat for another minute or two.
4- Reduce the mixer speed to low and add the sifted dry ingredients. Mix only until the dry ingredients are incorporated. For the best texture, you want to work the dough as little as possible once the flour is added.
5- Toss in the chocolate pieces and mix only to incorporate.
6- Turn the dough out onto a smooth work surface and squeeze it so that it sticks together in large clumps. Gather the dough into a ball, divide it in half, and working with one half at a time, shape the dough into logs that are 1-1/2 inches (4 cm) in diameter.
7- Wrap the logs in plastic wrap and chill them for at least 2 hours. (Wrapped airtight, the logs can be refrigerated for up to 3 days or frozen for 1 month.)
8- Center a rack in the oven and preheat the oven to 325 degrees F (165 C). Line two baking sheets with parchment paper and keep them close at hand.
9- Working with a sharp thin-bladed knife, slice the logs into rounds that are 1/2 inch (1.5 cm) thick.
10- Place the cookies on parchment-lined baking sheets, leaving about 1 inch (2.5 cm) spread space between them.
11- Bake only one sheet of cookies at a time, and bake each sheet for 12 minutes. The cookies will not look done, nor will they be firm, but that’s just the way they should be.
12- Transfer the baking sheet to a cooling rack and let the cookies stand until they are only just warm or until they reach room temperature.
13- Repeat with the second sheet of cookies.
---------------------------------------------------------------------

Bon Appetit! Enjoy!

Sunday, February 13, 2011

French Apple Cake...


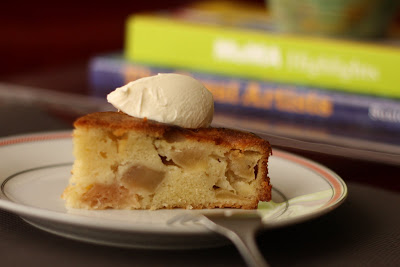
I am happy to introduce you to this very french, super moist, rustic, and easy to make apple cake :)

I came across this recipe while I was searching what to bake for a party in one of our friends' house, and there were a couple of specifications about what can be cooked... Firstly, the house we were going was kosher, and the dessert should have to be non-dairy... And secondly, it should not have nuts in it since one of our friends has nut allergy... Difficult for the dessert topic, since almost all desserts have some type of dairy in it and personally I love the crunch of nuts in them... I found this French Apple Cake recipe in
David Lebovitz's blog as an option and loved the simplicity of it... Although it has butter in it, butter can be easily substituted with margarine... At the end, I ended up not baking this cake for that occasion, instead baked my carrot cake without the walnuts, but the apple cake was in my mind as a to do since then... I tried the recipe yesterday for our guests who came for brunch, and I am very happy with the result and that I saved it for a good-butter day :)...

Original recipe is Dorie Greenspan's... And according to David Lebovitz, this is a very typique recipe of hers: "not a lot of ingredients, relying on no special techniques or hard-to-find equipment but producing simply spectacular results. The cake is easily mixed up in a bowl, scraped into a cake pan, and in less than the time it takes to run to the pâtisserie for a store-bought cake you can have an authentic French cake right from your own oven."


Here is the original recipe, I did not see any reason to revise the recipe since it works perfectly... And my comments in italic and paranthesis...

----------------------------------------------------------------------------

French Apple Cake
One 9-inch (23 cm) cake


Adapted from Around My French Table by Dorie Greenspan

3/4 cup (110g) flour
3/4 teaspoon baking powder
pinch of salt
4 large apples (a mix of varieties)
2 large eggs, at room temperature
3/4 cup (150g) sugar
3 tablespoons dark rum
(I used artificial rum extract that is sold at baking section in grocery stores. David says rum is "really vital for the taste, and the cake would be not as interesting without it. If you’re avoiding alcohol, you could double to triple up on the vanilla to compensate.")
1/2 teaspoon vanilla extract
8 tablespoons (115g) butter, salted or unsalted, melted and cooled to room temperature
(I used unsalted butter)

1. Preheat the oven to 350ºF (180ºC) and adjust the oven rack to the center of the oven.

2. Heavily butter an 8- or 9-inch (20-23cm) springform pan and place it on a baking sheet.
(The springform pan I used is 22cm)

3. In a small bowl, whisk together the flour, baking powder, and salt.

4. Peel and core the apples, then dice them into 1-inch (3cm) pieces.

5. In a large bowl, beat the eggs until foamy then whisk in the sugar, then rum and vanilla. Whisk in half of the flour mixture, then gently stir in half of the melted butter.
(When he says whisk, I used a hand mixer. When he says "stir", I used a spatula)

6. Stir in the remaining flour mixture, then the rest of the butter.

7. Fold in the apple cubes until they’re well-coated with the batter and scrape them into the prepared cake pan and smooth the top a little with a spatula.

8. Bake the cake for 50 minute to 1 hour, or until a knife inserted into the center comes out clean.
(I took mine out at 50 minutes) Let the cake cool for 5 minutes, then run a knife around the edge to loosen the cake from the pan and carefully remove the sides of the cake pan, making sure no apples are stuck to it.

Serving: Serve wedges of the cake just by itself, or with crème fraîche or vanilla ice cream. (
We ate with crème fraîche, and it really works well with the cake)

Storage: The cake will keep for up to three days covered. Since the top is very moist, it’s best to store it under a cake dome or overturned bowl.
(I covered with plastic wrap, it worked)
----------------------------------------------------------------------------

Bon Appetit! I hope you will enjoy it as much as we did...

Friday, December 10, 2010

Laz Boregi - Phyllo sheets filled with custard


Here is another recipe from Eastern Black Sea Region of Turkey, and this time it is a dessert.. This dish is a specialty of Rize region, and simply a baklava like dessert filled with custard instead of nuts..

Laz Boregi has a very interesting (weird) name for those Turkish people who are not from the region, since the name 'borek' is usually used for different types of pastry dishes with variety of savory fillings, except Laz Boregi.. And Laz is, according to Wikipedia, the name of the "ethnic group native to the Black Sea coastal regions of Turkey and Georgia".. Then, the English translation for this dessert would be 'Borek of Laz People'...

I am also from one of the small towns around Rize, and one of Laz people, and grew up eating this dessert.. Although, it is very easy to prepare when you can buy phyllo sheets from the grocery store, traditional way of doing it involves preparing the dough and rolling thin sheets out of the dough.. This is why it is never an everyday food, but more a specialty prepared for festivals, bayrams, important events like weddings, or for special guests..

Try this sweet pastry and you will love it.. For those of you who are familiar with Portuguese Custard Pie, it has a very similar taste to it.. Actually that is why I like buying custard pie once in a while, it reminds me this dessert of my childhood.. Hazelnuts go really well with Laz Boregi, so please take my advice and put some ground hazelnuts on top while serving - to spoil your taste buds.. With hazelnuts, it is like eating a baklava with custard - I don't know if it sound kind of awkward but tastes delicious...


Ingredients:
(for rectangular oven dish - 9'' to 13'' (22,5cm to 33cm))

1 pack of phyllo sheets (16 sheets)
90gr unsalted butter to brush the sheets

- Syrup -
1,5 cup granulated white sugar
1 cup + 2 tbsp water
1/2 tbsp lemon juice

- Custard -
1 lt 2% or whole fat milk
2 cups of granulated white sugar
140 gr ground rice or white flour
Pinch of salt
3 eggs


Recipe:

1 - At the very end of this preperation, you have to pour cold syrup over hot pastry.. That is why you should start the recipe by preparing the syrup.. Boil 1,5 cup sugar with 1 cup plus 2 tbsp water. When it starts boiling, add 1/2 tbsp lemon juice.. Continue boiling until it takes a thicker consistency.. (When cools down, it has to have honey consistency. Once cold, if it is more liquid than that, boil again for a bit more.)

2 - For the custard: mix 1 lt milk, 140 gr white flour (or rice flour) and 2 cups of sugar and start cooking over medium heat, and mix continuously.. When it tickens to a custard consistency, take it off the heat, and add 3 eggs one by one, mixing continuously after every egg. When you get a homogenous mixture, set the custard aside..

3 - Preheat the oven to 190 Celcius (374 Fahrenheit)..

4 - Melt the butter, and brush an oven safe rectangular dish (9'' to 13'') with melted butter..

5 - Place 8 of phyllo sheets one by one to the baking dish by brushing every sheet with butter.. Excess sheets will be hanging over the sides of the dish..

6 - Pour the custard, on top of the 8th sheet, and place the next 8 sheets on top by brushing every layer with butter..

7 - Brush the top of the last layer with butter.. Cut the overhanging edges with kitchen scissors or knife.. With a knife, mark last layer into squares delicately.. (Be careful for not to cut through to the custard level. This is only to make it easier to slice when the dessert is ready. If you cut all the way through, the custard will come out of the cuts while cooking.)

8 - Cook for approximately 30 minutes, or until the top gets the color in the photos posted..

9 - When you take the dish out of the oven, pour the syrup on top (pastry hot, syrup cold)..

10 - Wait 4-5 hours until dessert absorbs the syrup.. Cut into slices from already marked lines..

11 - Serve at room temperature.. I prefer serving with ground hazelnuts..


Enjoy!

Tuesday, November 2, 2010

My new go to Carrot Cake...


Without any hesitation, I can say that Cafe Fernando is my favorite food blog. At first it was because of his neat website, beautiful photos and good writing. After a while I could not hold myself back from trying his recipes and everything I tried tasted amazing... I believe the priority of the blogger should be building the trust with his/her followers, since they don't have any chance to taste the end-product before putting all the effort to buying the ingredients and applying the recipes... Everything I did from Cafe fernando tasted soooo good, most of the times they were even better than a product I would eat at a quality bakery (like this recipe, yummy)... Now I am at a trust level that I can try his recipe's for the first time for special guests and not be worried, since I know that he tests all the recipes multiple times and makes sure it works out, and I trust his taste buds...

The carrot recipe I am giving here is from his English blog, and I really liked the outcome... This is the richest moistest carrot cake I have eaten, and it does not need the classic icing... Only powdered sugar sprinkled on top is enough to enjoy it, as recommended by Cenk of Cafe Fernando...


Ingredients:
(the igredients are for a fluted pan with diameter of 25 cm or 9 inches)

2 cups all-purpose flour
1+1/2 tsp baking powder
1 tsp baking soda
1/2 tsp salt
1+3/4 tsp ground cinnamon
4 tbsp sweetened shredded coconut (I did with unsweetened and it also worked well)
3/4 cup grape seed oil (or sunflower oil or canola oil - I used canola oil)
3/4 cup white sugar
1/2 cup light brown sugar
4 eggs
Pinch of grated nutmeg
2+1/2 cup finely grated raw carrots
140 gr walnut halves
1 tsp butter for greasing the cake pan
1/4 cup powdered sugar - to be used for serving
zest of 1 orange - to be used for serving

Recipe:

1) Roast the walnuts in a non-stick pan on the stove or in the oven for 10-15 minutes. When they are cold, cut into big pieces, and put aside.

2) Preheat your oven to 350 F (170 C) and place a rack in the center of the oven. Butter a 9-inch fluted cake pan and set aside.

3) In a large mixing bowl, whisk together the flour, baking powder, baking soda, salt, shredded coconut, nutmeg and ground cinnamon. Set aside.

4) In another mixing bowl, whisk together (I used an electronic mixer) the eggs with the sugars until the batter is thick and light colored.

5) Add the oil and whisk to combine.

6) Add the flour mixture to wet mixture in 3 parts and each time mix until combined. Do not overmix.

7) Fold in the grated carrots and chopped nuts to the mixture.

8) Pour the batter into the cake pan and hit the pan to the counter couple if time to take the air out of the pan.

9) Bake for 50 minutes or until a toothpick inserted in the center comes out clean.

10) Remove from the oven and let it cool. After about 5 -10 minutes invert the cake onto a serving platter.
Right before serving, dust with powdered sugar. I also sprinkled some orange zest on top, to give some citrus smell and flavor...

11) Bon appetit!


Note: You can freeze the remaining cake by wrapping with plastic roll and again with aluminum foil. When you want to eat, just take the cake out of freezer and let is sit at room temperature for 6-8 hours... It is as moist and fresh as the first day...