
I have a list of cookbooks that I want to buy one day... Since I have a lot of them already and do not have enough opportunity to try the recipes I bookmarked, I try to pace out the buying part... One of those books is Art of Simple Food by Alice Waters of the famous restaurant in Berkeley, California... This gingersnap recipe is originally from that book, found and posted by David Lebovitz - that is where I found it...
This gingersnaps are low on the sugar but high on the complex flavor and aroma resulting from the combination of black pepper, ginger, molases, vanilla and cinnamon... And it fills your home with the beautiful/yummy smell of all these spices while baking in the oven and afterwards... My cookies ended up being crispy, and compared to the photo in David's blog mine were lighter in color and had more cracks on them... The result was definitely a success, my husband and my friends loved it... I highly recommend you to try if you like ginger and/or gingersnaps...
Below is the original recipe from David Lebovitz's blog, with my comments in parentheses and italic... Like the Korova Cookies, Ginger Snap cookie dough can be frozen for future use, which is very handy when you have company next time...
------------------------------
GINGER SNAPS
Makes 40-50 cookies (My cookie dough did not make as much, I had around 20 cookies from the total recipe)
From The Art of Simple Food: Notes, Lessons, and Recipes from a Delicious Revolution (Clarkson Potter) by Alice Waters.
2 cups (280 g) flour
1½ teaspoons baking soda
½ teaspoon salt
2 teaspoons ground cinnamon
1½ teaspoons ground ginger
½ teaspoon ground black pepper
11 tablespoons (150 g) butter, salted or unsalted, at room temperature (I used unsalted)
2/3 cup (130 g) sugar
½ teaspoon vanilla extract
¼ cup (80 g) mild-flavored molasses* (sometimes called ‘light’ molasses) (I used Turkish grape molasses, since I couldn't find light molasses in the grocery store and I had the Turkish one at home, and it worked great)
1 large egg, at room temperature
Optional step: coarse sugar crystals for coating the cookies (I highly recommend this step, it gives crunch to the cookies and also makes them look great)
1. Stir together the dry ingredients.
2. In the bowl of an electric mixer, or by hand, beat the butter just until soft and fluffy. Add the sugar and continue to beat until smooth, stopping the mixer to scrape down any butter clinging to the sides of the bowl.
3. Stir in the vanilla, molasses and egg.
4. Mix in the dry ingredients gradually until the dough is smooth.
5. Divide the dough in two equal portions and roll each on a lightly-floured surface until each is about 2-inches (5cm) around. Don’t worry if they’re not perfect; you can neaten them up in a second.
6. Wrap each in plastic wrap then roll them lightly on the counter to smooth them out. Refrigerate, or better yet, freeze the cookie logs until firm.
7. To bake, preheat the oven to 350F (180C) and line two baking sheets with parchment paper or silicone baking mats.
8. Slice cookie dough into 1/4-inch (a scant 1 cm) rounds with a sharp knife. Dip one side and press firmly in a bowl of coarse sugar if you want (you can also use granulated sugar instead), and place sugar-side up on baking sheet, evenly-spaced apart. Leave a couple of inches, about 5 cm, between cookies since they’ll spread while baking.
9. Bake for 10-14 minutes, rotating the baking sheets midway during baking, until deep-golden brown. The cookies will puff up a bit while baking, then settle down when they’re done. Bake on the lower end of the range for softer cookies, and more for snappier ones, depending on your oven.
10. Let the cookies cool two minutes, then remove them with a spatula and transfer them to a cooling rack.
Storage: The dough can be refrigerated for up to five days, or frozen for up to three months. Once baked, the cookies can be kept in an air-tight container for a couple of days but like anything made with butter, of course they’re best the day they’re baked.
------------------------------
Bon Appetit! Enjoy!

Here is another recipe that I tried last weekend... The original recipe is from Dorie Greenspan like the French Apple Cake recipe I posted today... I found this one at Cafe Fernando, and had my eyes on it for a while now...
These cookies are sent from heaven for those who love chocolate and especially bitter chocolate... I personally am not a big fan of chocolate desserts or bitter chocolate, but still liked a lot the cruncy texture of these cookies and also the salt after taste due to some sea salt in the recipe (The recipe recommends fleur de sel, but tells that can be substituted for sea salt)... I guess I should buy one of Dorie Greenspan's books - if all of her recipes are this straight forward and end results are this good it will worth the purchase...
Below is the original recipe from Cafe Fernando, with my comments in parentheses and italic... Another good thing about the recipe is that you can freeze half of the dough and use later... It can be kept frozen for a month...

---------------------------------------------------------------------
KOROVA COOKIES RECIPE
recipe from “Paris Sweets: Great Desserts from the City’s Best Pastry Shops” by Dorie Greenspan
Ingredients
Yields 28 cookies (half of my dough made 11 cookies, a bit less than what Cafe Fernando says, I might have cut my cookies bigger than his)
1+1/4 cups (175 grams) all-purpose flour
1/3 cup (30 grams) Dutch-processed cocoa powder (I used ordinary cocoa powder)
1/2 teaspoon baking soda
1 stick plus 3 tablespoons (150 grams) unsalted butter, at room temperature
2/3 cup (120 grams) packed light brown sugar
1/4 cup (50 grams) granulated sugar
1/2 teaspoon fleur de sel or 1/4 teaspoon fine sea salt (I used sea salt)
1 teaspoon pure vanilla extract
5 ounces (150 grams) bittersweet chocolate, chopped into small bits (I used 70% chocolate)
Method
1- Sift the flour, cocoa, and baking soda together and keep close at hand.
2- Put the butter in the bowl of a mixer fitted with the paddle attachment and beat on medium speed until the butter is soft and creamy. (I don't have a KitchenAid stand mixer, so I used the dough hook of the hand mixer for the stages 2,3 and 4)
3- Add both sugars, the salt, and vanilla extract and beat for another minute or two.
4- Reduce the mixer speed to low and add the sifted dry ingredients. Mix only until the dry ingredients are incorporated. For the best texture, you want to work the dough as little as possible once the flour is added.
5- Toss in the chocolate pieces and mix only to incorporate.
6- Turn the dough out onto a smooth work surface and squeeze it so that it sticks together in large clumps. Gather the dough into a ball, divide it in half, and working with one half at a time, shape the dough into logs that are 1-1/2 inches (4 cm) in diameter.
7- Wrap the logs in plastic wrap and chill them for at least 2 hours. (Wrapped airtight, the logs can be refrigerated for up to 3 days or frozen for 1 month.)
8- Center a rack in the oven and preheat the oven to 325 degrees F (165 C). Line two baking sheets with parchment paper and keep them close at hand.
9- Working with a sharp thin-bladed knife, slice the logs into rounds that are 1/2 inch (1.5 cm) thick.
10- Place the cookies on parchment-lined baking sheets, leaving about 1 inch (2.5 cm) spread space between them.
11- Bake only one sheet of cookies at a time, and bake each sheet for 12 minutes. The cookies will not look done, nor will they be firm, but that’s just the way they should be.
12- Transfer the baking sheet to a cooling rack and let the cookies stand until they are only just warm or until they reach room temperature.
13- Repeat with the second sheet of cookies.
---------------------------------------------------------------------
Bon Appetit! Enjoy!
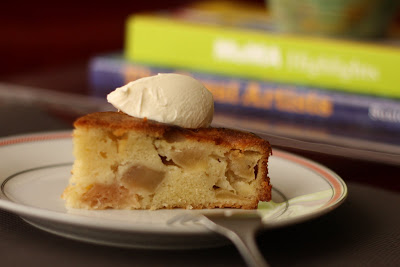
I am happy to introduce you to this very french, super moist, rustic, and easy to make apple cake :)
I came across this recipe while I was searching what to bake for a party in one of our friends' house, and there were a couple of specifications about what can be cooked... Firstly, the house we were going was kosher, and the dessert should have to be non-dairy... And secondly, it should not have nuts in it since one of our friends has nut allergy... Difficult for the dessert topic, since almost all desserts have some type of dairy in it and personally I love the crunch of nuts in them... I found this French Apple Cake recipe in David Lebovitz's blog as an option and loved the simplicity of it... Although it has butter in it, butter can be easily substituted with margarine... At the end, I ended up not baking this cake for that occasion, instead baked my carrot cake without the walnuts, but the apple cake was in my mind as a to do since then... I tried the recipe yesterday for our guests who came for brunch, and I am very happy with the result and that I saved it for a good-butter day :)...
Original recipe is Dorie Greenspan's... And according to David Lebovitz, this is a very typique recipe of hers: "not a lot of ingredients, relying on no special techniques or hard-to-find equipment but producing simply spectacular results. The cake is easily mixed up in a bowl, scraped into a cake pan, and in less than the time it takes to run to the pâtisserie for a store-bought cake you can have an authentic French cake right from your own oven."

Here is the original recipe, I did not see any reason to revise the recipe since it works perfectly... And my comments in italic and paranthesis...
----------------------------------------------------------------------------
French Apple Cake
One 9-inch (23 cm) cake
Adapted from Around My French Table by Dorie Greenspan
3/4 cup (110g) flour
3/4 teaspoon baking powder
pinch of salt
4 large apples (a mix of varieties)
2 large eggs, at room temperature
3/4 cup (150g) sugar
3 tablespoons dark rum (I used artificial rum extract that is sold at baking section in grocery stores. David says rum is "really vital for the taste, and the cake would be not as interesting without it. If you’re avoiding alcohol, you could double to triple up on the vanilla to compensate.")
1/2 teaspoon vanilla extract
8 tablespoons (115g) butter, salted or unsalted, melted and cooled to room temperature (I used unsalted butter)
1. Preheat the oven to 350ºF (180ºC) and adjust the oven rack to the center of the oven.
2. Heavily butter an 8- or 9-inch (20-23cm) springform pan and place it on a baking sheet. (The springform pan I used is 22cm)
3. In a small bowl, whisk together the flour, baking powder, and salt.
4. Peel and core the apples, then dice them into 1-inch (3cm) pieces.
5. In a large bowl, beat the eggs until foamy then whisk in the sugar, then rum and vanilla. Whisk in half of the flour mixture, then gently stir in half of the melted butter. (When he says whisk, I used a hand mixer. When he says "stir", I used a spatula)
6. Stir in the remaining flour mixture, then the rest of the butter.
7. Fold in the apple cubes until they’re well-coated with the batter and scrape them into the prepared cake pan and smooth the top a little with a spatula.
8. Bake the cake for 50 minute to 1 hour, or until a knife inserted into the center comes out clean. (I took mine out at 50 minutes) Let the cake cool for 5 minutes, then run a knife around the edge to loosen the cake from the pan and carefully remove the sides of the cake pan, making sure no apples are stuck to it.
Serving: Serve wedges of the cake just by itself, or with crème fraîche or vanilla ice cream. (We ate with crème fraîche, and it really works well with the cake)
Storage: The cake will keep for up to three days covered. Since the top is very moist, it’s best to store it under a cake dome or overturned bowl. (I covered with plastic wrap, it worked)
----------------------------------------------------------------------------
 Bon Appetit! I hope you will enjoy it as much as we did...


